31 August 2015

Something's coming, something good...

Could it be? Yes, it could.
Something's coming, something good,
If I can wait!
Something's coming, I don't know what it is,
But it is
Gonna be great!
I do love a good West Side Story lyric.

And something good is coming: a new issue of Knitty hits the interwebs tomorrow! They say the server has been beefed up to handle first-day traffic, but let's see what we can do about that :)

You will find something of mine in it. Something with a cable. Something with an interesting structure. Something that you'll need to get yarn for at your favorite fiber festival (or maybe you already have but haven't been sure to do with that lovely pile of wool).

I think I owe you a proper #weddingsweater wrap-up post, but apparently jetlag got the best of me last week, and I haven't been able to dig up any new photos of the sweater. I do know that my sister has worn it since the big day, so that's good. Since that sweater lives in Germany, I may need to knit one up for myself. For modeling purposes, you know.

There are a few patterns in need of photographs, and the list of samples I want/need to knit keeps growing (see above), but I'm back to work, my dears, and plan to have more lovely things for you soon. Or as soon as the weather turns more hospitable (ugh, NYC heat wave right now).

Tomorrow I will tell you all about the Knitty thing and about my birthday month. Until then...

Thanks for stopping by, and happy knitting!
xoxo,
Kathleen

24 August 2015

Wedding sweater: Wedding day

This is the moment we've all been waiting for, right?

The wedding was lovely! Bride and groom were (and are) so happy. The guests were international and polyglot. Everything went off without a hitch :)

Here are a few snapshots of the beautiful bride in her very own sweater...

Buttoned-up bride

Back with eyelet raglan lines

Side details

Beautiful bride

Cousins!

Glowing bride showing the sweater

The happy couple by the bride-made brownie tower with sparklers
that served as the most delicious wedding cake

I'm sure there is much to say on the subject of the sweater, but jetlag is getting the best of me, and I am just so happy that my sister is happy. I'll share more details next week.

Previous steps: 1. Yarn choice. 2. Sketching. 3. Swatches 4. Math(s) 5. WIP 6. Yoke 7. Buttons 8. Sleeve Seams 9. Weaving underarm stitches 10. Buttons, part deux

Next week: Final thoughts

Thanks for stopping by, and happy knitting!
xoxo,

17 August 2015

Wedding sweater: buttons, part deux


What do you do when your needle won't fit through your delicate button's holes? Ugh, this happens to me more often than I would like. Sometimes I search through my tapestry and sewing needles to see if I can find one that will sneak through, but then I start to worry that I won't be able to thread the yarn onto said needle. And I do worry that using sewing thread might cut through the knitted fabric. Call it paranoia.

oh, tapestry needle, why you so big?
Not too long ago, though, I realized that I could make use of my ridiculously tiny crochet hook, used to add beads to my Emily 2 shawl to snag (carefully) the yarn and pull it through the small holes on the buttons in question.

check it: 1.0mm crochet hook
Of course, this means I can't do my usual button attachment technique, which involves a long piece of yarn and weaving my way up the back of the button band to attach the buttons at regular intervals. But that's OK.

snagging that loop o' yarn and pulling it through
As you can see above, I pull a loop of yarn through the button's hole to get things started. Here's my method for each button:
  1. cut piece of yarn 10-12 inches long
  2. fold yarn in half
  3. put hook through button's hole
  4. snag folded end of yarn and pull loop through button's hole approximately one inch
  5. thread loop onto tapestry needle and pull through button band to back above the button hole to be closed, then remove tapestry needle and hold loop with a free finger
  6. thread tails onto tapestry needle and pull through button band to back, which also serves to close up the button hole in band
  7. pull tails on tapestry needle through yarn loop
  8. pull ends snug up to button to tighten loop
  9. weave one tail through stitches above button anchor location on back of button band
  10. weave second tail through stitches below button anchor location on back of button band

uh-oh, where's that last button?!
If you follow me on Instagram, you may have seen my panic about a missing button. Luckily, after turning my various project bags upside-down and inside-out, I found the little, precious thing. At the bottom of the project bag that holds the other project bags. But, yikes!

Finally, all the ends are woven in, buttons attached! All we need is a wedding...

Previous steps: 1. Yarn choice. 2. Sketching. 3. Swatches 4. Math(s) 5. WIP 6. Yoke 7. Buttons 8. Sleeve Seams 9. Weaving underarm stitches

Next step: Wedding day!

Thanks for stopping by, and happy knitting!
xoxo,  


13 August 2015

You know you have hit the big time when...

What do you think? Is it:
  1. you're featured on the Ravelry home page
  2. everyone wants to have you as a guest on their podcast
  3. your best, most popular pattern is being sold by someone-not-you on Etsy
And if you chose #3, sadly, you'd be "big time" me this morning and my An Aran for Frederick pattern.

(pics from my phone, as I was at the beach this morning when this all started to go down)


Ugh! Crap/shoot/sugar/effin effers/darn it to heck!*

How does this even happen? I got a nice message from someone on Ravelry (thank you, Inna!) who noticed and recognized my pattern being sold as an Instant Download on Etsy. And, get this: the vendor was charging more! Granted, only 22¢ more, but still. LittleNinni was using the Interweave/Jane Austen Knits photo, so my backup plan was to get F&W Media involved if necessary.

I reported the listing to Etsy this morning and crossed my fingers. I did also go back and read Hunter's post, since this happened to her not too long ago. I was ready to report the Intellectual Property theft to Etsy once I got home (difficult to do on a phone), but when I checked the listing had been taken down. Yay! (Don't worry - I am totally willing to file the IP stuff if it shows up again and will happily get F&W involved.)

"This Item is Unavailable"

I will keep an eye on the shop and add a scroll through some search key words on Etsy to my regular task list (aran sweater, cable sweater, lace sweater - let me know if you think of any good ones in the comments). I was aware that this happens sometimes - there are a few threads about it in the various designer groups I belong to on Ravelry - but somehow I never thought it would happen to me. Guess I still think I'm small-time or something.

Interestingly, most of the shop's patterns are for somewhat hoochie crochet bikinis and some pretty crochet beach coverups. Since I'm not a crocheter, I can't tell if those are original patterns or what the deal is. But as a knitter I immediately recognized another Jane Austen Knits pattern, which has come down since this morning. And I noticed a Vogue Knitting lace jacket pattern by Brooke Nico and the gorgeous Winter Wonderland Coat by Michele Rose Orne, so I paid it forward and dropped each of them a note on Ravelry, so they could get those patterns taken down.

What possesses people to do such things? My lovely Instagram and Facebook peeps got delightfully and righteously angry - it's good to know there are so many lovely people in my life who will rise to my defense! My answer to them (and you lovelies) is that some people are lazy and greedy, I guess. Or just plain stupid, maybe? How can you think that it's OK to sell someone else's work online?

Luckily, most people are kind and good. You all appreciate the hard work that goes into pattern creation, and you buy my patterns from me or the magazines in which they are featured or you support places like Knitty, which provides some of my patterns for free.

So, what can you do? Keep being wonderful people! Buy patterns from their designers (especially me, hehe) and support the publications you like. Don't make copies and give them away, even to new knitters who are freaking out about how much the supplies for their new passion cost. Loan them a book or pattern, if necessary, or gift them a pattern on Ravelry. If you can't afford it, save up. It shouldn't take very long to save up $7. Would you rather have an excellent pattern or a fancy cup of coffee? We can't all have everything we want in life without paying for it (much as my children might like that).

And educate other crafters in the ways of pattern creation. I wish I could create patterns and give them away, but I need to eat, too. If someone can't afford my seven-dollar-tested-edited-professional-layout-photography-graded-charted-written-calculated-yarn-amounts pattern, then they should probably consider another craft, since the yarn alone for one of my patterns is at least five to ten times that amount. And if you can spend, potentially, hundreds of dollars on yarn to knit one of my designs, you sure as hell* can spend seven dollars on my pattern.

Thanks for stopping by, keep being good people, and happy knitting!
xoxo,


*I try to keep profanity off my blog (even if I may have something of a passionate potty mouth IRL), but this issue really sticks in my craw. And, sometimes, a four-letter word is the mot juste. xo, k

10 August 2015

Wedding Sweater: Weaving underarm stitches

Oh, Kitchener Stitch. For some, you are the epitome of agony. 

After countless seamless sweaters, I feel that I have finally gotten this underarm-weaving stuff down. Sometimes people refer to it as grafting, as well. That said, it still takes me a while to do it, and I did such a good job avoiding finishing work this summer that I ended up with three sweaters in need of all this work!

Here's the thing about Kitchener Stitch, though: it's really cool! With a tapestry needle and some extra yarn, you almost magically weave together two pieces of fabric so that you can't tell where one ended and the other began. If you want a really in-depth look at Kitchenering, be sure to visit TechKnitter's site.

Here's how I did it on my sister's sweater:

To begin, you slip your held underarm stitches to two knitting needles (or both ends of a circular needle, as shown below). Think of them as the front and back needle. If you are grafting the front/knit side of Stockinette together, you should have the front side facing you. Thread a length of yarn onto a tapestry needle. Don't be stingy with the length of yarn! I like to leave at least a six-inch tail at the beginning and then use that to tidy up the "corner".

stitches ready to be grafted together + tapestry needle ready to do the job

Basically, we are going to lead the yarn in and out of each stitch twice to create an additional row of stitches that bonds both fabrics together. There are two basic moves (through a stitch as if to knit and through a stitch as if to purl), plus taking a stitch off the needle, and two rows to work on (front and back), which tends to mean a bajillion ways to get confused.

People tend to get flustered at this point, finding it difficult to remember the ins and outs of the stitches as we move from front to back. Truly, it is simpler than you think. This is not to say it isn't confusing - it definitely can be.

The way I remember it is that I always begin the sequence by pulling the tapestry needle through the front stitch as if to purl. With this move we never take the stitch off the front needle.

through the front as if to purl

Then we go to the back needle and pull the tapestry needle through the back stitch as if to knit. And, again, if we are knitting the back stitch, it does NOT come off the needle.

through the back as if to knit

Now, we go back to the front needle and put the yarn through as if to knit, which means it is time to take a stitch off the needle (yay!). That only happens when you are knitting a front stitch, though. And having done that we have to turn our attention to the next stitch on the front needle and bring the yarn through as if to purl (just like our very first move).

through the front as if to knit and about to jump off the needle

Then we go to the back needle and put the yarn through as if to purl, which means it is time to take the stitch off that needle (yippee!). This also means we then turn our attention to the next stitch and bring the yarn through as if to knit (our very second move).

Here it is in pithy format:

  1. yarn through stitch on front needle as if to purl
  2. yarn through stitch on back needle as if to knit
Some people like to think of the above as the preparatory steps to Kitchenering, but I think of them as just part of the whole thing, since we constantly toggle back and forth between those moves and the moves that get the stitches off our needles. 

Having done 1 and 2 above, proceed thusly:
  1. yarn through stitch on front needle as if to knit and off needle
  2. yarn through stitch on front needle as if to purl (#1 above)
  3. yarn through stitch on back needle as if to purl and off needle
  4. yarn through stitch on back needle as if to knit (#2 above)


After each stitch, be sure to gently pull the yarn snug. Not tight, just snug. If you're worried, you can leave it loose and go back and tighten up the stitches at the end to match the gauge of your fabric. Be sure to keep your working yarn to the right side of your needles. None of this works going over top of the needles.

grafted underarm stitches before a little tugging to match gauge

When you have grafted all the stitches together, you can adjust the stitches to match your knitting tension. Then use the tails to tidy up the corners (I have yet to get really scientific about this part and still feel like I "wing it" every time.

A helpful notion: stitches are only ready to come off the needle if they are being worked as they would be in regular stockinette fabric. That is: stitches on the front needle would be knitted, if we were to continue working them in our imaginations. And stitches on the back needle, if you look closely, are at the top of purled fabric, right? Also, remember that stitches must have the working yarn weave through them twice.

see how smooth the graft is? haven't finished up the seam on this sleeve yet

So, how do you feel about Kitchener Stitch now? Clear as mud or a little better? Like lots of knitting things, I find that it's a matter of "getting" the trick. Remember learning the Long-Tail Cast-On? I still can't truthfully say I understand it on a deep level, but my fingers know how to do it, and it works out perfectly. I think that now I know how grafting works, weaving in and out of the stitches, but for quite a while there I just followed the steps and it worked. Like magic! Like knitting :)

Happily, we are in the home stretch on this wedding sweater adventure (whew!), and next week I'll show you the trick I use when working with teeny buttons.

Previous steps: 1. Yarn choice. 2. Sketching. 3. Swatches 4. Math(s) 5. WIP 6. Yoke 7. Buttons 8. Sleeve Seams

Next step: Buttons, part II.

Thanks for stopping by, and happy knitting!
xoxo,  


08 August 2015

quick + purly: 5 wedding bags

Ooh, we are coming up on my sister's wedding in a couple of weeks! The #weddingsweater is coming along (it may have taken over a little, which is why this post is a day later than usual), so I don't think I will have time to knit any of these, but since wedding-appropriate knits are on my mind, here are five bags that seem appropriately special and bridal to me.


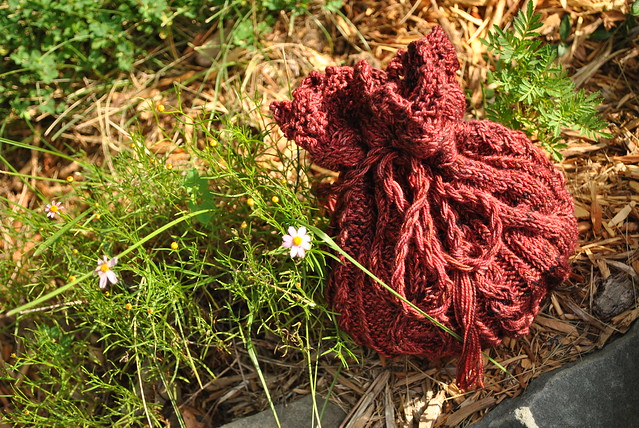
  1. Keep It Secret, Keep It Safe by Erica Leuder $4.99 USD 
    cables + lace + a pretty drawstring + Tolkien reference
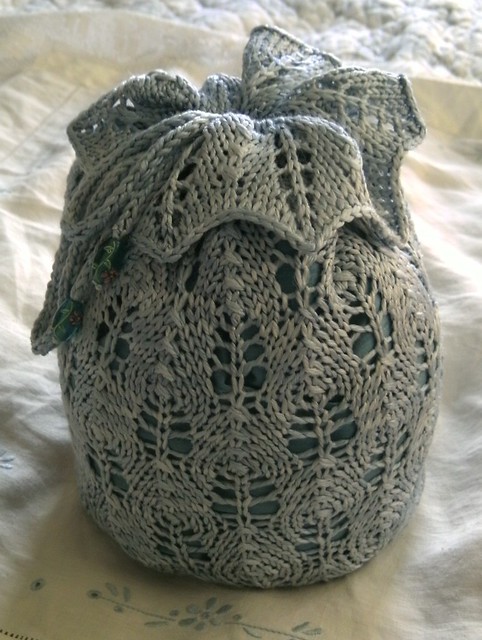
  2. To Have And To Hold by Anne Kingstone £4.25 GBP 
    more pretty lace, this time with beads on the drawstring
  3. Victorian Beaded Mesh Bag by Lynette Meek $8 USD 
    all.the.beads and a tassel
  4. Utterly Charming by Maria Näslund $6 USD 
    lovely German lace pattern (glove pattern, too)
  5. Pretty Awesome Yarn Pouch by Jackie Erickson-Schweitzer $6 USD 
    perfect for your yarn yet suitably bridal, too
All images from patterns' Ravelry pages. No copyright infringement intended. I just want to share the love!

Do you have a favorite wedding knit to recommend? Let us know in the comments below :)

Thanks for stopping by, and happy knitting!
xoxo,

05 August 2015

Pattern: Dennis

Dennis on Ravelry $7 (no account necessary)

Back in the day, I remember my dad, Dennis, sporting a cool knit tie like this for casual wear. Now everyone seems to be getting in on the action. Quick to knit from luxurious alpaca and silk, this tie has an elegant texture that makes it stand out (quietly) from the crowd and would make a great gift for the man (or woman) in your life.


I used the entire skein for the small tie, so if you want to knit a gauge swatch, be sure to buy a second skein or be prepared to frog your swatch.  The men’s tie will leave you with plenty of yarn for a swatch and the tab, to keep the tail of the tie under control (men like that kind of thing; ladies usually wear their ties with a little more insouciance).

The Spot Stitch gives interest for knitter and wearer while being easy to remember. It is also a good lesson in “seeing” your knitting with purl bumps every other stitch every other row.

Columns of purl stitches up both sides help it to lie flat in the front, while the back, knit flat, helps the yarn go further, keeps the around-the-neck area slim, and the front lie smoothly over the back.

What you'll love about knitting Dennis:
  • Stitch pattern for the front of the tie is easy to remember and is both charted and written out.
  • Thoughtful construction makes the most of your yarn yet makes a proper tie.
  • A relatively small amount of knitting time yields a great accessory to give or to keep.

What you'll love about wearing Dennis:
  • This is a fully-fashioned tie, not a small scarf in a tie shape.
  • Stitch pattern is subtle yet special.
  • You will look like a million bucks!


Size/Finished Measurements 
Small [Large]
Width at widest point: 3 inches
Length: 55 [60] inches after blocking

Materials
Blue Sky Alpacas Alpaca Silk [50% silk, 50% alpaca; 146yd/134m per 50g skein]; color: Plum; 1 [2] skeins
US2/2.75mm set of four double-pointed needles (DPNs)
US4/3.5mm set of four DPNs
Tapestry needle

Gauge
24 sts x 30 rows = 4 inches square in Stockinette stitch on larger ndls

Skills Needed
Casting on
Binding off
Knitting
Purling
Working in the round
Working flat
Decreasing
Working with DPNs


Thanks for stopping by, and happy knitting!
xoxo,

03 August 2015

Wedding Sweater: Sleeve seams

Oh, we are getting to the home stretch now! First, two sleeves to seam up. Why work the sleeves flat and seam? I'm just being extra-finicky here and knit the sleeves flat to make sure there was no difference in gauge between the sleeves and the body. If this weren't a very special sweater, I might have worked the sleeves in the round. Then again, I might have done it the same way, since my speed knitting vs. purling is very similar. Now, whether that's because I'm a thrower/English knitter or because I learned to purl right away after learning to knit, I don't know. It is my understanding that pickers/Continental knitters tend to work the knit stitch more quickly. And then there are knitters who learn the knit stitch first and perfect that before they learn to purl, which leads to purling being more awkward for them.

mattress stitch seams for the sleeves

When I am sewing up seams, I use mattress stitch. It works so well for connecting the sides of things. As you can see above, I take the tapestry needle under two stitch bars on one side. And then (not pictured), I pull the tapestry needle through the corresponding bars on the other side. This is also the reason why I work sleeve increases a couple of stitches in from the edges of the work: it is more difficult to pick up the bars in the increase column of stitches (at least it is for me).

What a pretty seam!
And here is how the sleeve looks part-way through seaming. So tidy, and you can hardly tell where the join is.

Previous steps: 1. Yarn choice. 2. Sketching. 3. Swatches 4. Math(s) 5. WIP 6. Yoke 7. Buttons

Next step: The "dreaded" Kitchener stitch.

Thanks for stopping by, and happy knitting!
xoxo,